| Buyer's Guide |
 |
| Article Base |
| |
Flap wheel use in finishing sanding*Finish Sanding of Wood and how it works
* Flap wheel sanding and how it works
* Sanding with Flap Wheels
* Building a flap wheel sander for use after the moulder
|
| Building a Flap Wheel Sander |
| |
Sanding your molding with a flap wheel head after the molder will help decrease surface markings and aid in creating a better product. In working with molders it is critical to keep spindle tooling clean, sharp, and well balanced. With this combination and making sure to not over drive feed speeds a decent profile can be produced on most molders.
The next step is proper sanding of the material after the shapes have been created. I have found only two methods that will work well for sanding profiled material. One is using a shaped wheel that matches the profile of your product. These shaped wheels are similar in nature to a grinding wheel. These shaped wheels can remove a fair amount of material and will help with removing tooling marks but will not finish sand your surface nor help with color balance. You will also need a head to match each profile you want to create.
The second way to sand the profile is with a flap whee. Flap wheel heads are designed to be flexible in order to conform themselves to the shape being sanded. This has the unique benefit of very small changes in machine or head settings to accommodate different profiles. When sanding molding with a flap wheel head you must understand that only a small amount of material is going to be removed.
Sanding in this way will do no harm to your profile but only a limited amount of tooling marks will be removed. If you start with good tooling and produce a good clean molding cut then flap wheel sanding will finish sand your product to the point of being ready to apply stain or primer.
The flap head will remove the small fibers that pop up when sanded in any other way or when any type of chemical or water is applied to the surface of the material. These fibers if not removed will raise up and set in a dried position causing a rough primer or stain and seal coat.
If not removed the raised fibers will require additional sanding time between coats to achieve a smooth top coat. Utilizing a flap wheel head will remove these fibers resulting in much less sanding time between coats. You will also benefit from the fact that flap wheel heads will insure a uniform pore opening in the material. Uniform pore openings result in uniform color balance throughout the work surface.
Building your own flap wheel head as an attachment on the out feed end of the molder could be your solution. With today's availability of inexpensive motors and controllers you should give this idea some consideration. In most cases a little fabrication work to mount a motor or two with heads on the out feed end of your molder is not difficult to do. You will want to make sure the heads can be adjusted up and down and also the ability to tilt the head can be very useful. Up and down adjustment is a must to accommodate different thicknesses of material. The ability to tilt your heads will help when running a profile that is considerably thicker along one edge than the other. Just keep in mind the need for more heads as feed rates increase. It will take approximately two heads for up to 20 feet per minute feed rates.
Using four heads will get you up to approximately 60-70 feet per minute feed rates and still give good quality sanding. You will also want to make sure the heads are counter rotating. Counter rotation insures that one direction of spin will lift the fibers while the other direction of rotation successfully removes the lifted fibers. Giving you a better finish that required less sanding between coats and used less sealer coat to get there. |
| Flap wheel sanding and how it works |
| |
Imagine you have taken a great deal of time and care to create an intricate profile for a special project. No matter if this profile were created by hand, by manual router, by a CNC style machine or a molder. The next step is going to be how to sand this intricate profile without destroying the detail. I know of only one method that works well, the flap wheel head. Flap wheel heads are designed to be flexible. This flexibility allows the head to conform to the shape being sanded. When a flap wheel head of the proper configuration is applied to your material multiple things will happen.
In Raw Wood Sanding
First, the process of flap wheel sanding denibbs your product. This is to remove the small fibers that pop up when sanded in any other way or when any type of chemical or water is applied to the surface of the material. These fibers if not removed will raise up and set in a dried position causing a rough primer or stain and seal coat. This will require additional sanding time being needed between coats to achieve a smooth top coat. Utilizing a flap wheel head will remove these fibers resulting in much less sanding time between coats. In some cases less finish materials will be required because there is less fiber to cover.
Second, you will benefit from the fact that finish sanding will insure a uniform pore opening in the material. Uniform pore openings result in uniform color balance throughout the work surface.
Third, you will slightly soften the sharp edges. Softening these edges eliminates the area that is almost impossible for stain, sealer, or paint to find enough mass to adhere. Incorporating a slight radius in these areas eliminates the weak area in a finish. It also makes sealer or primer sanding much easier in that you are less likely to sand through the finish in these areas.
In Sealer or Primer Sanding
First, you will have a more thorough and uniform scuff of the sealer or primer coat. This scuffing will ensure a superior bond between seal or primer coat and the top coat.
Second, if the material was properly sanded in the raw, you should now be able to flap wheel sand the sealer or primer coat without burning through or white lining your product.
Third, a more uniform and overall higher quality of the finish.
Biggest benefit in both raw and sealer or primer sanding? You increase quality while decreasing LABOR! |
| How to Finish Sand Wood |
| |
If you desire a superior finish on your wood project then special attention must be paid to the finish sand process. I am referring to that final sand just prior to applying stain or primer.
Once you have properly sized your product through the use of aggressive sanding methods and made sure all imperfections are corrected, it is time to finish sand.
The finish sand process is that part of the job that will blend the pores of your material resulting in excellent color balance when applying stain. Finish sanding when done properly will also denibb your work piece and soften the corners eliminating weak areas in the finish.
When I refer to blending the pores it is the process of obtaining a uniform pore opening throughout the work surface. Uniform pore openings will result in consistent stain absorption through out the material with end result being superior color balance throughout the material with no blotchiness of the stain.
Denibbing your work piece will remove the fibers that pop up when any type of stain or primer is applied. These fibers once dried cause rough texture in the seal or primer coat. Removal of these fibers during the finish sand process will ensure a smoother sealer or primer coat and less labor for sanding between coats.
Softening the edges of your work piece during the finish sand process will eliminate the sharp corners that have so little mass as to be difficult to get stain or sealer to properly adhere. These sharp edges become the weak areas in the finish of any wood project as they can be easily damaged even by cleaning.
The only method of finish sanding that will denibb your product, give a uniform pore opening, and soften the edges is the utilization of a flap wheel type head. This head can be as simple as a hand held air or electric motor driven tool or as elaborate as a fully automated multi head sander capable of sanding four sides simultaneously in a single pass.
The point here is Flap Wheel. Flap wheel heads come in all sizes and grits and are available both in a paper only configuration and also brush backed type paper. Both versions work. I prefer the brush backed type as you get more pressure at lower rpm due to the brush supporting the sand paper. Flap wheel heads without brush backing need a higher rpm to sand properly as you are relying on centrifugal force to create the pressure.
Flap wheel
In most applications I use either a 180 or 220 grit brush backed paper for finish sanding. These heads will conform themselves to the shape being sanded. This ensures good consistent sanding throughout the work piece. Areas that are profiled will be sanded as well as the flats.
End Result? You will achieve a better finish that is more durable and spend less time getting there. |
| Making your arbor for your flap wheel head |
| |
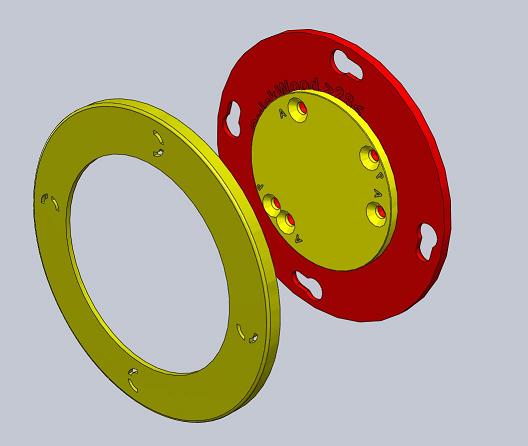
Making you arbor size to fit your spindle.
The universal flange will be a 3 piece flange, find the center piece and turn it around, you will see a pre-drilled center hole where you want to put your hole saw drill bit. This marks the center of the plastic hub piece.
Using a hole saw to drill you arbor size is the best way of getting a true size arbor hole, if you don't have a hole saw drill bit they are available at home depot or on the internet.
 Once you have made your arbor hole in one center piece just do it again for the second center piece on the other side of the hub. Once you are done with the 2 arbor holes, put the Universal flange back together and mount it on each end of your hub with the set screws provided. You are now ready to sand with you new flap wheel. If you want flap-wheels.com to provide you with predrilled universal flanges for your arbor size, please provide your arbor size in millimeter or inches at time of check out or respond to your order email and we will make the flap wheel ready for you.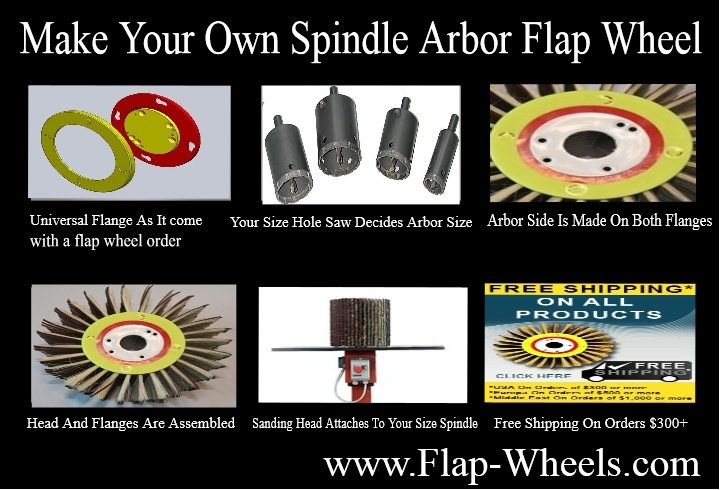 |
| Replacement of flap wheel strips |
| |
Instructions
to replace strips
Replacement of abrasive and brush strips is easy. Just follow these 3
steeps
1. Take off the top flange by removing the 2 set screws from the flange
and you will have access to the hub.
2. Once your top flange is off, you can slide the abrasive strips out
from the hub and remove them one by one.
3. Take you new strips and slide them into the hub one by one, remember
to face the sandpaper in the right direction so the sandpaper will go
the same direction all the way around. Make sure that you are putting
the sandpaper in so the sandpaper is facing the way your spindle rotates
and the sandpaper is facing the wood surface.
Sanding hours before replacing the
sandpaper/brush strips
The brush is there to back up the abrasives while sanding and the
abrasive is there to do the sanding job.
Replacing sanding strips should be done when the sandpaper is worn out,
this will normally be after sanding with the head for 500-1000 hours
depending on sanding pressure. Sometime the sandpaper and brush last
much longer than this.
When looking at the sanding strips the sandpaper is about 10mm longer than the brush, when the sandpaper is shorter than the brush its time to replace the sandpaper.
Right sanding speed for flap wheels
When using flap wheels the right sanding speed is between 200rpm to 800
rpm to get the right sanding, any faster and the sandpaper will break
down to fast. If you can change the spindle speed with an inverter that
would be the best. As you would normally want to sand with 400-800 rpm
for white wood sanding. For sealer sanding the right sanding speed is normally 200-400 rpm.
Sanding with the right speed on your spindle is very important for the sandpaper and the brush strips to do its job. If the RPM's of your spindle are to fast it will not allow for the sanding wheels to do its job.
|
| Sanding with Flap Wheels |
| |
 Flap wheels are designed to sand pieces
with contour or a profile. This can be on a door, a furniture part, a hobby
project part or anything else that is not flat in design.
Anyone can sand a flat
component but having a work piece with contours creates some challenges.
Utilizing flap wheels takes away the challenges of sanding a profiled or contour
surface.
Flap wheels are designed to be flexible and conform themselves to the
shape being sanded. Flap wheels flex to the different dimensions and shapes of
the work piece and sand both high and low areas with the same effectiveness. It
will be gentle around edges as the sandpaper fingers will flex out and let the
higher part be sanded at the same time as the lower parts of a
profile. Flap wheels sands best at spindle speed between 300rpm and 800 rpm, and the wheels are rate for max speed of 1200 rpm
5 Things Flap Wheels are used
for.
1.
Edge Break
(Breaking of sharp
edges)
When a cabinet door or molding part is ready for
stain and sealer coat its very important that sharp edges are eliminated. Sharp edges are a weak area in
the finish as there is not enough mass for stain, sealer, and top coat to
properly adhere.
Picture a knife and you are trying to apply stain to the sharp
edge,
it just will not stick to the sharp edge. Breaking (slight rounding) of the edges eliminates this issue and has become a standard practice in
the cabinet and door industry. A flap wheel does an even break of the edges so the parts
are ready for stain and sealer coat.
2. De-nibbing (Removing of loose fibers)
When the work piece is ready to stain and seal or paint, there is one last step to insure a quality
finish.
If you examine the work
piece closely you will always find loose fibers from the sanding operation that are
part of
the surface of the
wood.
These fibers are what you feel after
a sealer coat or primer has been applied and cured. The surface of your material is now rough.
This is the result of
the fibers absorbing sealer or primer and expanding and then drying. Use of flap
wheel sanding prior to stain or priming will eliminate these loose fibers. This
process is called de-nibbing. De-nibbing a product will make for a much smother
seal coat and result in much less sealer or primer sanding prior to top coat.
You gain the added benefit of using less sealer also as now you are not trying
to cover the fibers as they have been removed.
3. Uniform Stain Color
When sanding a work piece and applying
stain, many times the
color will not be consistent. This is primarily due to different sanding
techniques or pressures being used in different areas of the work surface. It is
very difficult to try and sand a flat area the same as a contoured or profiled
area. As a result the pore openings in the surface of your material will be
different and absorb stain at a different rate. This causes uneven color match
or balance. Flap
wheels will sand 3 dimensional products evenly. Your pore opening will be uniform and as a result
you get a superior color balance throughout the work piece.
4. Sanding Sealer
Without Cutting Though The Edges.
When hand sanding a stain and sealer work
piece one must always be careful of the edges to not sand through and white line
the work piece. Flap wheels are designed to handle this fine sanding without removing the sealer and causing burn through or white lines
in the finish. In a
study completed in Germany it was found that most woodworking shops
hand sanding removed too
much sealer and had to
repair many pieces prior to top coat. By using the flap wheel sanding approach you achieve the correct
amount of sealer scuffing to create a superb bond with the top coat without
white lining or burning through the stain. This will give your product better protection for the
future.
5. Reduce Hand Sanding
The speed of sanding with a flap wheel
compared to hand sanding is just incredible.
Studies show that using a spindle and a flap wheel are more than 10
times faster than hand sanding.
This frees
you up to do more or
other things. The quality of the sand is many times better than a hand sanding
as it will always be uniform.
These flap wheels can be
used on any spindle from 2" to 36" in length and can be used on any arbor that
your spindle might have from 1/4" to 2".
Save yourself the time of hand sanding and know that the
product you create
is
protected with a
superior and uniform finish with excellent quality.
|
| How do I buy/redeem a gift certificate? |
| |
To purchase a gift certificate for someone, click here. If you are the recipient of a gift certificate and would like to redeem your gift certificate, click here. |
| How do I find my product? |
| |
To find the product(s) you're looking for, you may (1) use the navigation menus on the top, left & bottom of our website. (2) type a keyword into the SEARCH box. If you have any trouble locating a product, feel free to contact customer service for assistance. |
| How do I navigate the site? |
| |
To navigate this website, simply click on a category you might be interested in. Categories are located on the top, left & bottom of our website. QUICK TIP: Place your mouse cursor over anything you think could be a clickable link. You'll notice that anytime you scroll over something that is a link, your mouse cursor will become a "hand". Whereas scrolling over anything that is NOT a link will leave your cursor as an "arrow". You may also type a keyword into the SEARCH box to quickly find a specific product. If you have any trouble locating a product, feel free to contact customer service for assistance. |
| How do I use a coupon? |
| |
After adding items to your cart, click the "View Cart" link at the top of this site to view your cart. At the bottom of the shopping cart you'll see a box where you may enter your coupon code. |